
- Knowledge Center
- System Settings & Billing
-
Basic Employee Training
-
Video Resources
-
FAQ
- Admin Portal
- Application Security
- Assets
- Assessment
- Audit
- Change Management
- Communication and Notifications
- Compliance Manager
- Data Security
- Document
- Endpoint Security
- Framework Control Manager
- Human Resources
- Incident Response
- Identity & Access Control
- Infrastructure(Network) Security
- Integration
- Physical security
- Policy and Procedures
- Report
- Risk Management
- Security Awareness Training
- SSO
- Ticket
- Training
- Users
- Vendor Management
- Vulnerability Management
- Miscellaneous
-
FAQ's for Admins
-
Release Notes
-
Role Management
-
Compliance Manager
-
Ostendio Document Wiki
-
Ostendio Crosswalk™
-
System Settings & Billing
-
Vendor Connect
-
Documents
-
Auditor Connect
-
Crosswalk Assessments
-
Assessments
-
Audits
-
Training
-
Tickets
-
Users & Groups
-
Ostendio API’s & Integrations
-
Risk Management
-
Collections
-
Office Hours
-
Partner Admin Portal
-
Framework Control Manager
-
Reports
-
Assets
-
Ostendio Platform Set-up
Branding MyVCM with Your Logo
You can brand your MyVCM instance with your organization's identity by uploading your logo to the Admin console.
You can brand your MyVCM instance with your organization's identity by uploading your logo to the Admin console. The logo appears in the upper lefthand corner of your MyVCM portal when users and administrators sign in.
How to add your logo to your MyVCM instance:
- Go to Settings on your Homepage
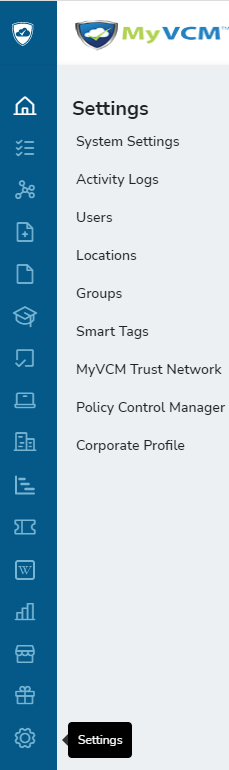

2. Click on System Settings and the edit function (pencil in box) in the Logo section


3. Upload your JPEG, GIF or PNG logo. The maximum file size is 250kb and the maximum dimensions are 215px* 50px. Use the MyVCM positioning feature to ensure that your logo fits within the dimension. You can preview how your logo will look before you press save.


4. Once you have saved your logo, it will then appear on the top left-hand corner of every MyVCM page.