Article Contents:
How to Create a New Group
How to Edit a Group
How to Add a Group to an Ostendio Item
Assigning Bulk Documents and Training
Begin by clicking the Settings icon ![]() from the left-side menu. Next, Select Groups from the sub-menu.
from the left-side menu. Next, Select Groups from the sub-menu.

To Create a New Group:
- Once in the Groups menu, click the Add Group button in the top right-hand corner


- Enter the name of your group.
- Next, select if your group type will be ‘Static’, or ‘Dynamic’.
- Static groups contain users specifically saved to that group, and can only be edited manually.
- Dynamic groups, by comparison, are updated automatically and are controlled by one or more criteria. For example, if you create a dynamic group containing every employee from the Finance department, then all Finance department employees who are added to Ostendio thereafter will be added to this group automatically.

- Enter a description of the group (optional) and click Next to continue.
- Choose the list of users that will be a part of your group.
- Click Save to complete.
To create a static group:
- Once in the Groups menu, click the Add Group button in the top right-hand corner of the Groups menu.
- Enter the name of your group.
- Choose Static as the group type.
- Enter a description of the group (optional) and click Next to continue.

- Choose the list of users that will be a part of your group.

- Click Save to complete.

To create a dynamic group:
- Once in the Groups menu, click the Add Group button in the top right-hand corner.
- Enter the name of your group.
- Choose Dynamic as the group type.
- Enter a description of the group (optional) and click Next to continue.

- Enter the conditions that will be used to create a dynamic group. When creating a dynamic group you can choose 2 different sets of rules, with 3 different conditions to create the filter.
-
-
- In Filter By, choose the field in a user's profile that Ostendio will use to select the user.
- Operator specifies how the filter criteria relate to one another.
- Employee Property allows you to enter the specific data from the selected field in the user profile that Ostendio will base its logic on.
-
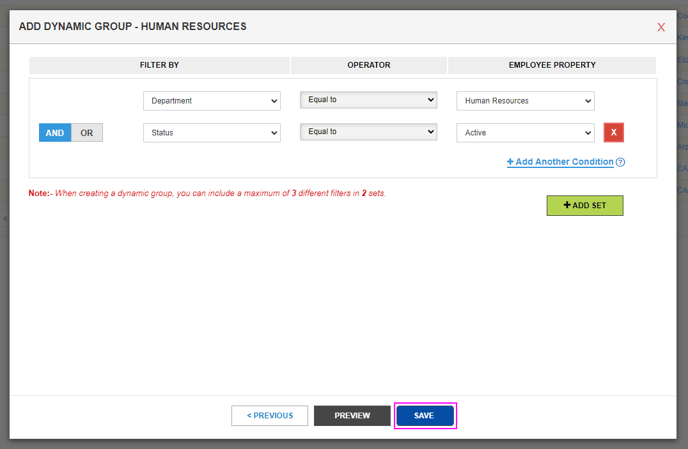
PRO TIP: You can preview the list of users your filter has created by selecting the Preview button located at the bottom of the page. 
7. Click Save when complete.
To Edit a Group:
- Click the Settings icon
 in the left side menu. From the Settings sub-menu, click Groups.
 - Use the Groups menu to select the group you want to manage.
- By default, you will land on the Users tab which displays a list of users associated with the group.
- In a dynamic group, the Manage Dynamic Group button will display on the Users tab where you can edit any of the filter logic used to make the dynamic group.
- In a static group, the Manage Static Group button will display on the Users tab where you can add/remove users in a static group.

- Click the Edit Group button in the top right corner of the overview page to edit the information about your selected group, such as the name and description of the group. In addition, you can make changes to the lists of users in a static group, or change any of the filter logic used to make a dynamic group.
- The Used In tab displays all objects within Ostendio that the group is a part of.
- The Activity Log tab in a group displays activities related to modifying or changing the group. All activity associated with individual Ostendio objects reside with the object, or in the master activity log.
- To edit your group, just click the ‘Edit Group’ button in the right-hand corner of your group overview page.
- Depending on the type of group (Static or Dynamic), you will be met with a window where you can make changes to your group.
- Click Preview to see the users in your group.
- Click Save to save all settings in your group.
- You will be prompted with the following message: "Please wait while we verify & save the group."
- You can now click the Activity Logs tab to confirm that the change has been made

- If you click on the gear icon
 on the right-hand side of the Groups' overview page it will provide you with the following options:
- Delete
- Clone and Create New
- Send Message
NOTE: Deleting a group will remove it from your Ostendio instance. All members of the group will no longer be associated with the Ostendio objects that the group was added to. The activity logs will still maintain an audit trail, and retain all the activities that individuals performed as a member of the group.
Assigning Bulk Documents and Training
Using Groups, you can perform single or bulk operations. For example, you can choose to assign multiple documents to a Group for acknowledgment or assign one training to an entire group.