
1. Ownership
Add your assessment title. In this step, you may also add Custodians and Consumers, adjust the Due Date, and choose if you would like this assessment to be private.
- If you have an Internal Auditor who needs to review your assessment, assign the assessment for internal review
- Need other staff members to stay in the Internal Audit loop? Add Internal Audit Custodians to allow them to access and review the Assessment
- Click Next.

2. Template
- Select Create from Import as your assessment source.
- From the dropdown, select Create from blank.
- Click Upload Files.

- You must now manually map the appropriate columns from your import to create your assessment. Select the column headers from the .xls or .xlsx file in each dropdown to determine where you would like the information from within those columns to be mapped in the Ostendio Assessment.
Map (connect) as many column headers as possible from your imported excel spreadsheet with the platform. This allows the system to automatically identify the imported content, simplifying the process for you. Additionally, users can import additional columns with the ability to display a different title, provide a description and choose to make optional or mandatory.
- Once you have mapped the necessary headers, click Next.

3. Answer Type
Select the Answer Type for the Assessment
- For this example, we will select our Answer Type as SCF CMM (Recommended).
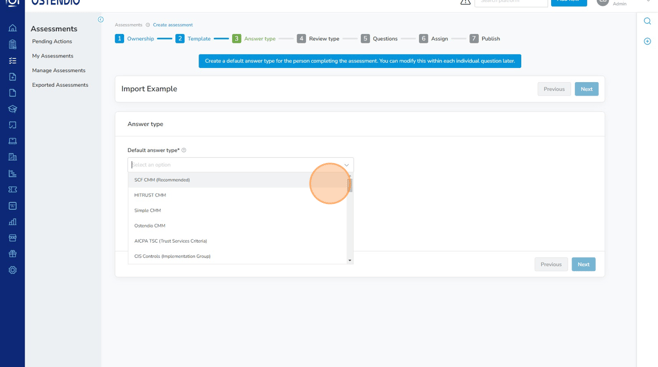
Note: If you'd like, please select the question score for each question. This assigns a value to each answer type to allow Users to track and analyze the progress or maturity of each question.
Click Next

4. Review Type
Within the Review Type section, you will be able to configure the review options for the auditor who will be reviewing this assessment.
- For this example, we will be using the default options but you can add a neutral option if desired.

5. Questions
Customize Assessment Questions
- Edit, update, delete, and reorganize the questions in the Assessment to meet the needs or requirements of your Organization. The pen and pad icon will allow you to edit the questions and a drag and drop function will allow you to reorganize the order of Sections and Questions within the Assessment
- Assign a weight to questions (if desired)
- When editing a question, you will notice the ability to assign a weight to the question to define its importance relative to the others in the Assessment. The default question weight is set to '1'.
- Add instructions to a Question or Section
- When editing a Question or Section, the user can add instructions. This helps explain what needs to be done to answer a question or what items should be compiled as evidence in the question. Once published, the user can view the instructions on the Assessment by clicking the question mark next to the section or clicking the 'Show Instructions' button within the Question
- Click Next

6. Assign
Select External Assessment and select your vendor.

- Choose your Vendor from a list of Vendors you have previously engaged with, through the My Organizations dropdown. If you have not worked with the Vendor in Ostendio, choose Create New Organization.

- A Vendor can be added through either the Ostendio Trust Network or from your Organization. You can search for a company via the search bar, or browse them alphabetically. If you would like to establish a new vendor to send an Assessment, select Create New Organization.
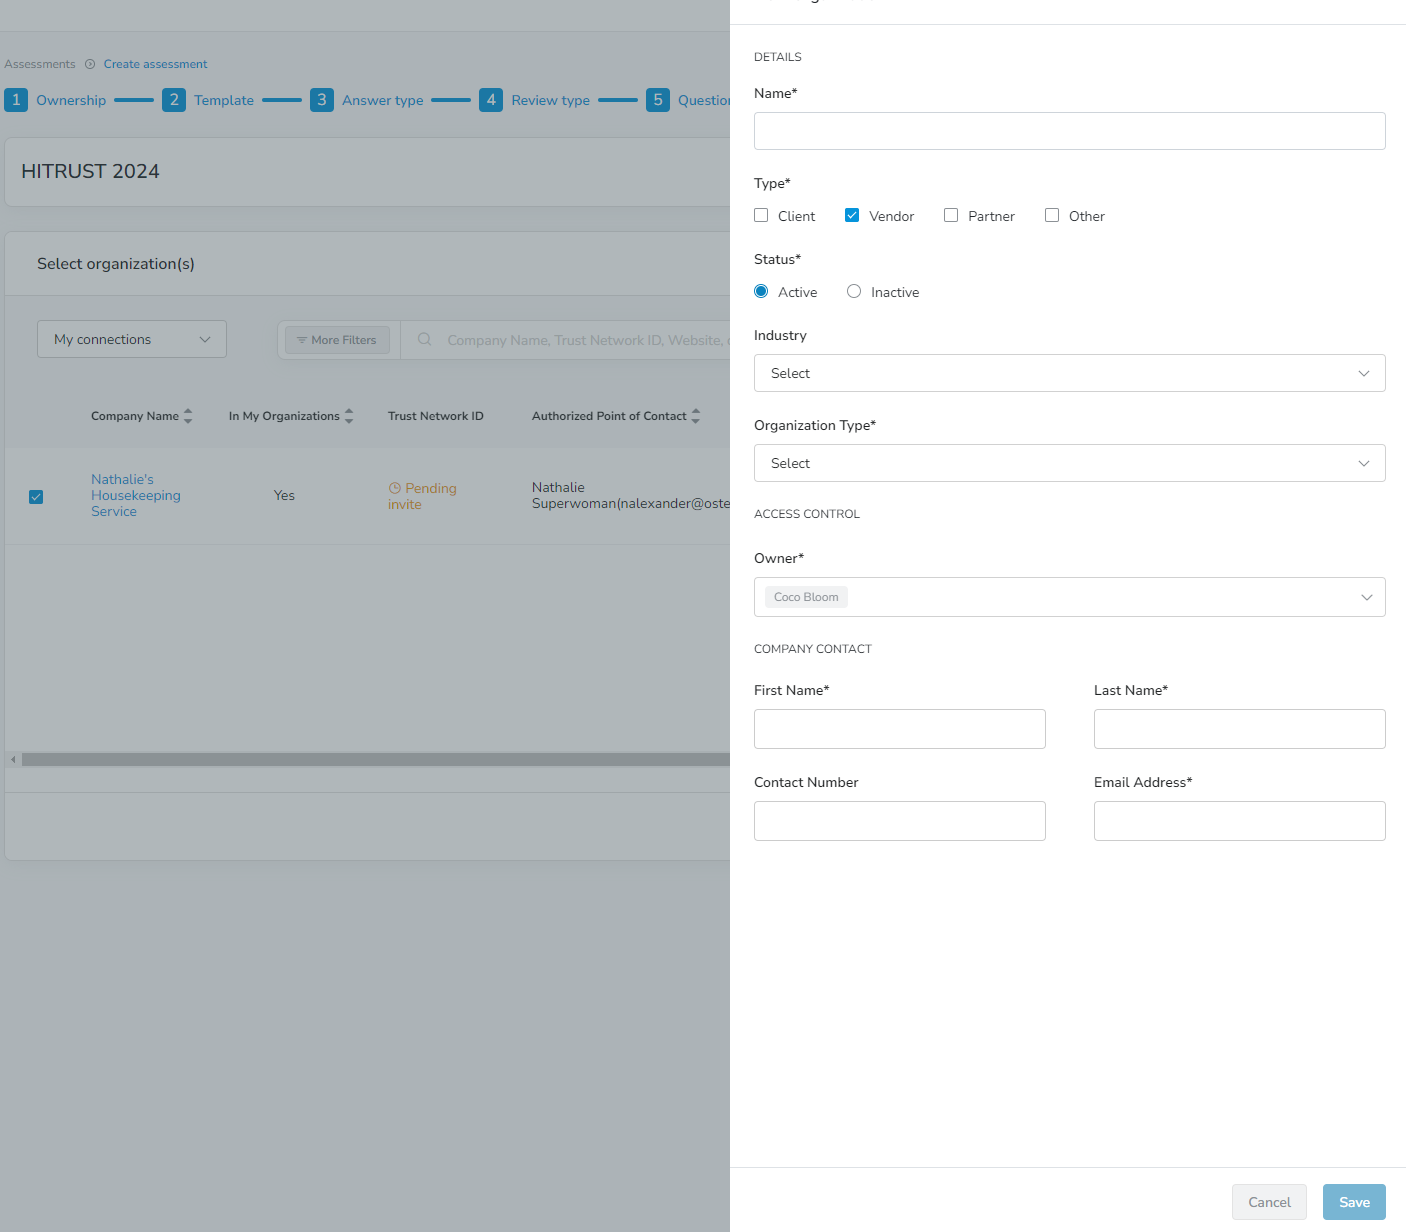
- Type in the company domain, and select the correct domain of the Vendor to which you wish to send an Assessment. Fill out the required fields (including Company Contacts) and click submit. Once the assessment is published, these contacts will receive an invitation to complete the assessment through Ostendio Lite.
- You can select more than one vendor (up to 50) to send the assessment to at once. If there are multiple points of contact available when creating a new vendor, select one of them to be the assessment recipient. That contact will then be able to add up to 4 other users on their Ostendio Lite account.

Definitions
Requester: The person who is responsible for building the assessment, ensuring that the assessment covers the required questions before sending it to an internal or external auditor or the vendor. There can only be one Owner per assessment and it is a required field.
Responder: The person to whom the assessment is sent. The responder is responsible for completing the assessment.
Be sure to enter a recipient due date if you would like to include a due date for the Vendor to complete the assessment.
Step 5
- Check the box to complete the Vendor Assessment Confirmation. Click Confirm & Send.

*Note* Ostendio Vendor Connect will fill 1 license when a Ostendio customer establishes a new connection for the requesting Ostendio instance. Only the Ostendio instance that is initiating the request is charged a license.