With a Microsoft account, you will be able to configure SSO in 2 ways: OAuth & SAML. The steps required to configure both options are listed below. Only one option can be used at a given time
Steps for configuration
- MSO-1: Login to your Ostendio instance
- MSO-2: Select “System Settings” from the left-side Menu (“gear” icon)
- MSO-3: Click on “Single Sign-On” (“edit” icon)
- MSO-4: Tick check box of “Activate Single Sign On”
- MSO-5: Select “Microsoft” under “SSO Provider Options”
- MSO-6: Select “OAuth” in-front “Microsoft”
- MSO-7: Click “Save”

Configuration using SAML
Using Security Assertion Markup Language (SAML), you can use your Microsoft Azure credentials to sign in to enterprise cloud applications via Single Sign-On (SSO).
Steps for Configuration
- MSS-1: Login into Microsoft Azure portal at portal.azure.com using your administrator account and click on Azure Active Directory on the left

- MSS-2: This will open the Default directory. Click on “Enterprise Applications” on the left-hand side menu

- MSS-3: Click the link of “+ Add” on top menu

- MSS-4: Portal will display a list of applications. Click on “Add Your Own” on top

- MSS-5: Portal will display the wizard for creating a new custom app

- MSS-6: Select “Deploying an existing application” & enter name as “Ostendio”. Then click “Add” button

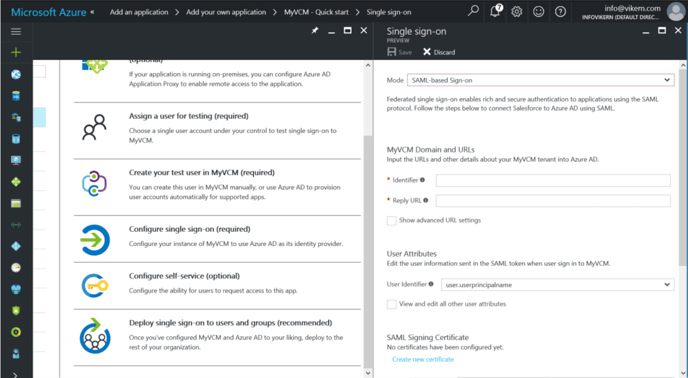
- MSS-7: Once the application is created successfully, portal will display options to configure the newly created app. Click on “Configure Single Sign-On” from this screen.

- MSS-8: In the configuration window, enter the following information
-
- Identifier
- This is the SSO URL for SAML.
- https://<your-domain>.ostend.io/main/resultssogateway.aspx
- Reply URL
- Same as Identifier
- User Identifier
- Select “user.userprincipalname”
- Notification Email
- Provide email address of your administrator managing SSO
- Identifier
- Click “Create New Certificate” to proceed

- MSS-9: Portal will display attributes to define the expiry of certificate
- A certificate can be made available for a maximum of 2 years
- Select an expiry date & click “Save” button.

- MSS-10: Once an expiry date is chosen, portal will display the certificate under heading” SAML Signing Certificate”.
- Once the certificate is created choose “Make new certificate active” and click on “Save”.

- MSS-11: Click on “Configure Ostendio” and then click on “SAML XML Metadata”.
- Download the XML metadata and save it. (This will be used in next step).

- MSS12: Follow steps MSO-1 to MSO-5 as provided and then,
- Select “SAML” in-front “Microsoft”
- Upload XML file downloaded in step MSS-10. This field is mandatory
- Click “Save”

